
How To Turn Your Basic Bodice Block Into 5 Different Wearable Tops

Last time, I showed you how to transform one basic skirt block into 5 different wearable patterns.

Today, let’s do the same thing with your bodice block.
If you’ve drafted your basic bodice but you’re not sure what to do with it next, you’re not alone. Most people think the block itself is the finished pattern. It’s not.
Your bodice block is a blank canvas. It’s the foundation you manipulate to create every top, blouse, and dress bodice you’ll ever make.
(And if you don’t have your basic blocks yet, The Basic Pattern Set teaches you how to draft them (bodice, skirt, sleeve, off-shoulder blouse, and princess blouse) all fitted to your exact measurements with no ease added.)
Here are 5 different tops you can create from one basic bodice block.
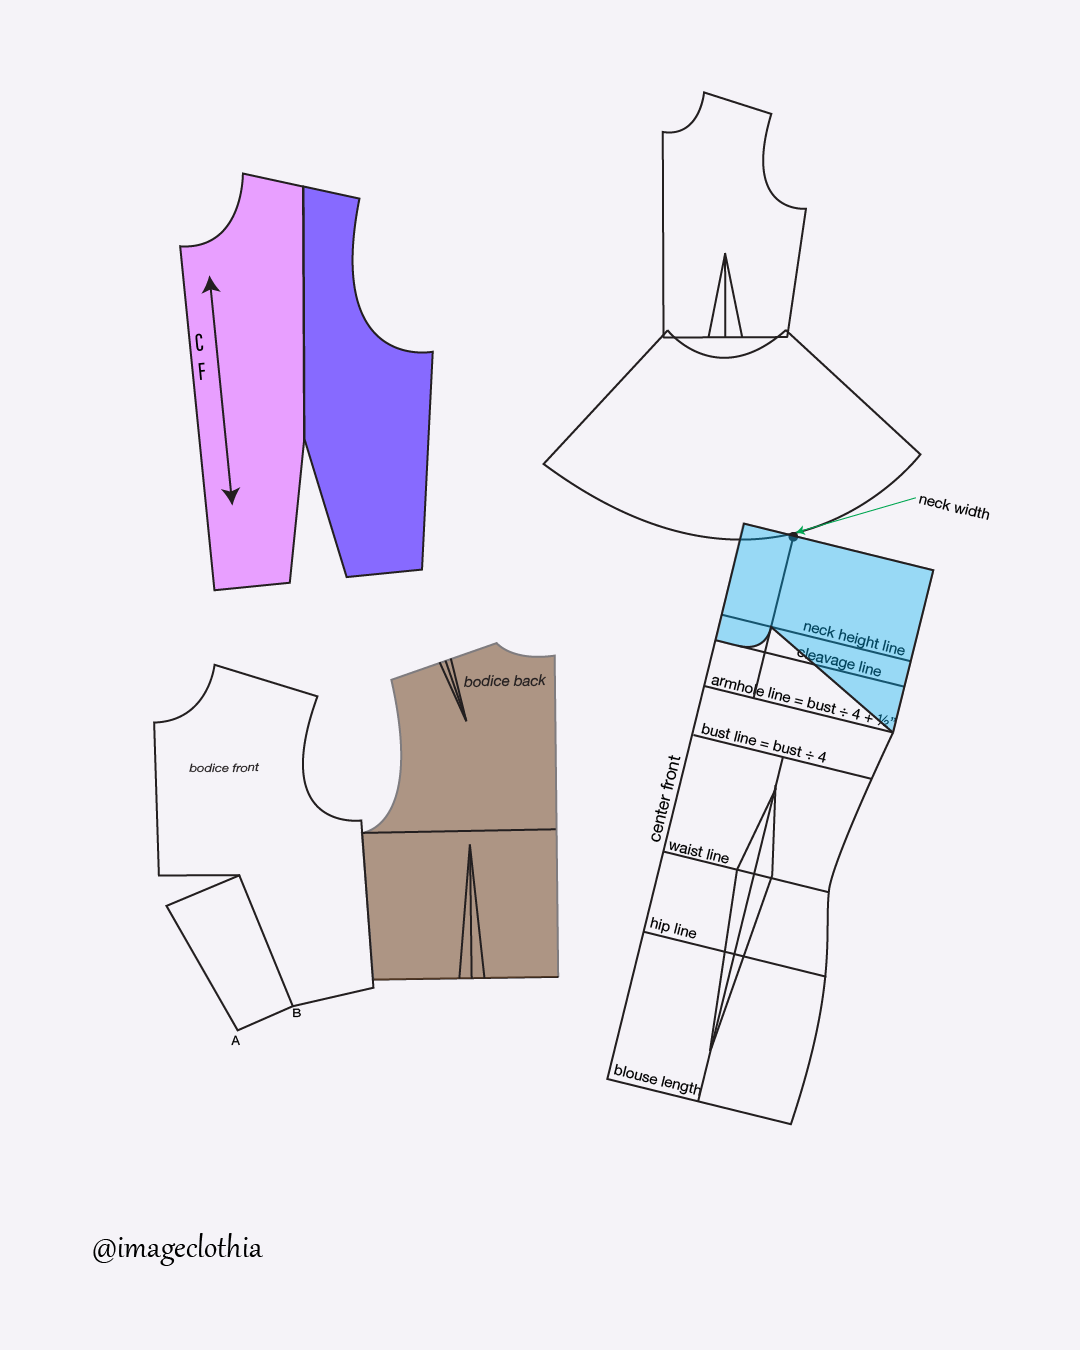
1. Off-Shoulder Blouse: Cut away the shoulder for an elegant neckline (without making it too wide)
An off-shoulder blouse is exactly what it sounds like: a basic blouse where the shoulder is cut away, creating an elegant neckline that sits below the shoulders.
Here’s how to draft it:
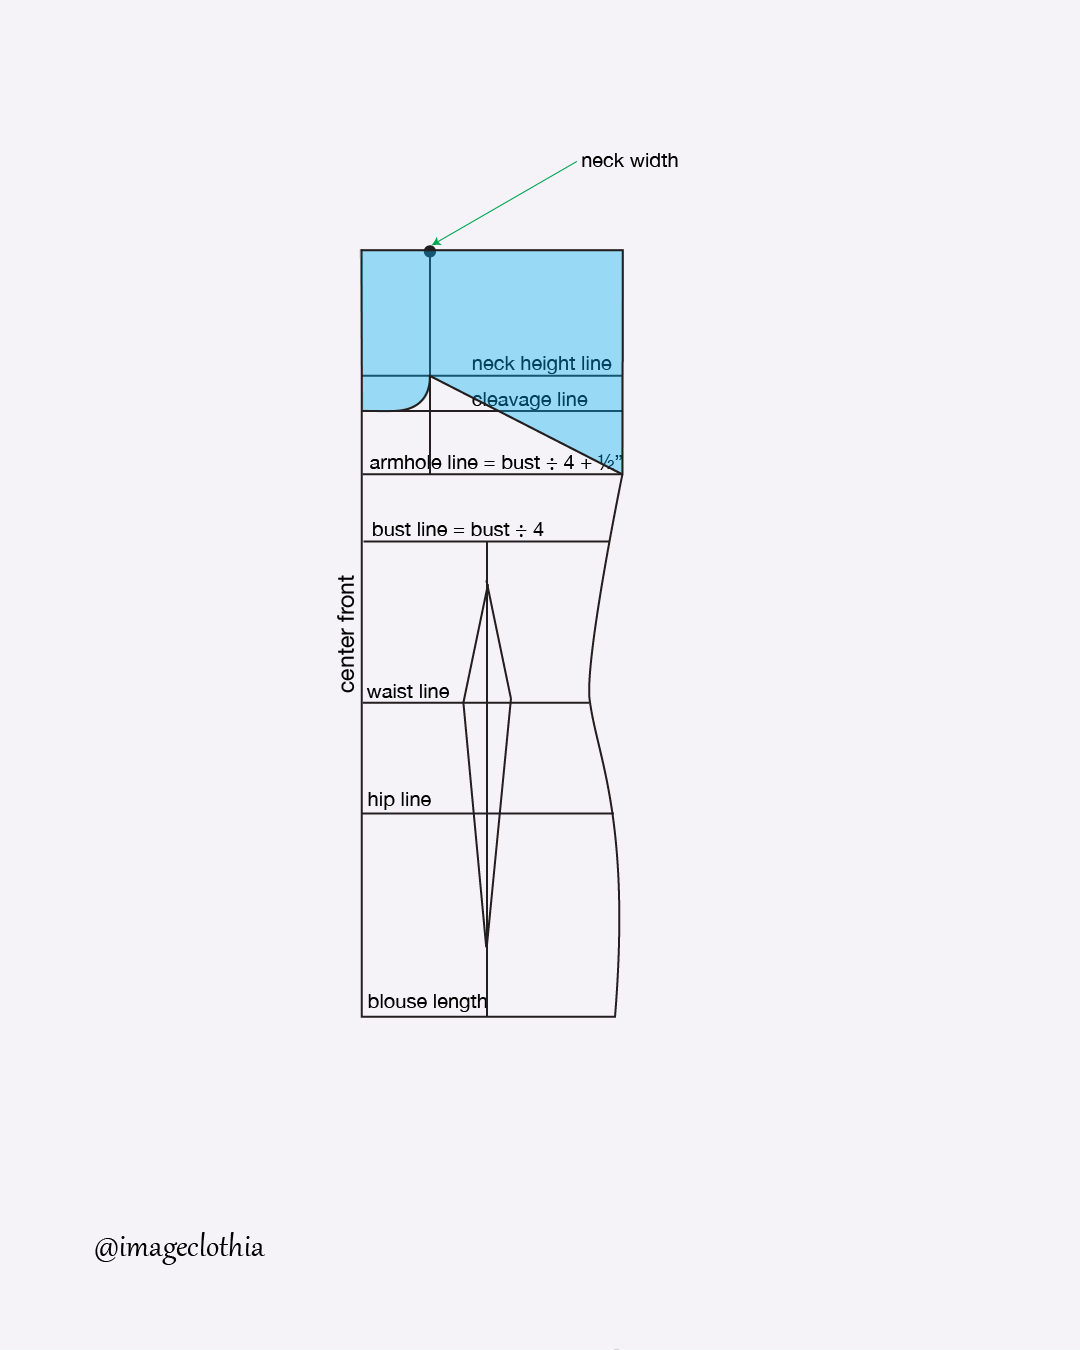
Start with your basic bodice block with a straight shoulder line. (This should be your fitted block, drafted to your exact measurements with no ease. If you’re using The Basic Pattern Set, you already have this foundation.) From the shoulder line, measure down your armhole length using the formula (Bust ÷ 6 + 1.5”) minus ½”.
Next, measure your neck height from the shoulder line (use a neck height table based on your bust circumference—for a 33-37” bust, that’s 4”). Draw this line.
Then measure your cleavage depth from the shoulder line. This determines how deep you want the neckline. The example uses 1” below the neck height, but you can adjust this for more or less coverage.
Mark your neck width point and draw a vertical line from this point down to intersect the neck height line, cleavage line, and end on the armhole line.
Where the neck width line intersects the neck height line, draw your desired neckline shape (sweetheart, V-neck, straight across) using the cleavage line as your guide.
At the intersection of the neck width line and neck height line, draw a slanted line to meet the side seam on the armhole line. This is your new shoulder line.
Cut away everything above this slanted line.
For the back, use your front pattern as a guide and create a straight neckline with zipper allowance.
But here’s the mistake most beginners make: They skip the neck width point and just cut straight across from center front to armhole. The result? A neckline that’s way too wide and won’t stay on your shoulders.
The neck width point and that vertical guideline are critical. They ensure your off-shoulder neckline is proportional and actually stays in place.
One basic block. Strategic measurement points. An off-shoulder blouse that sits exactly where it should.
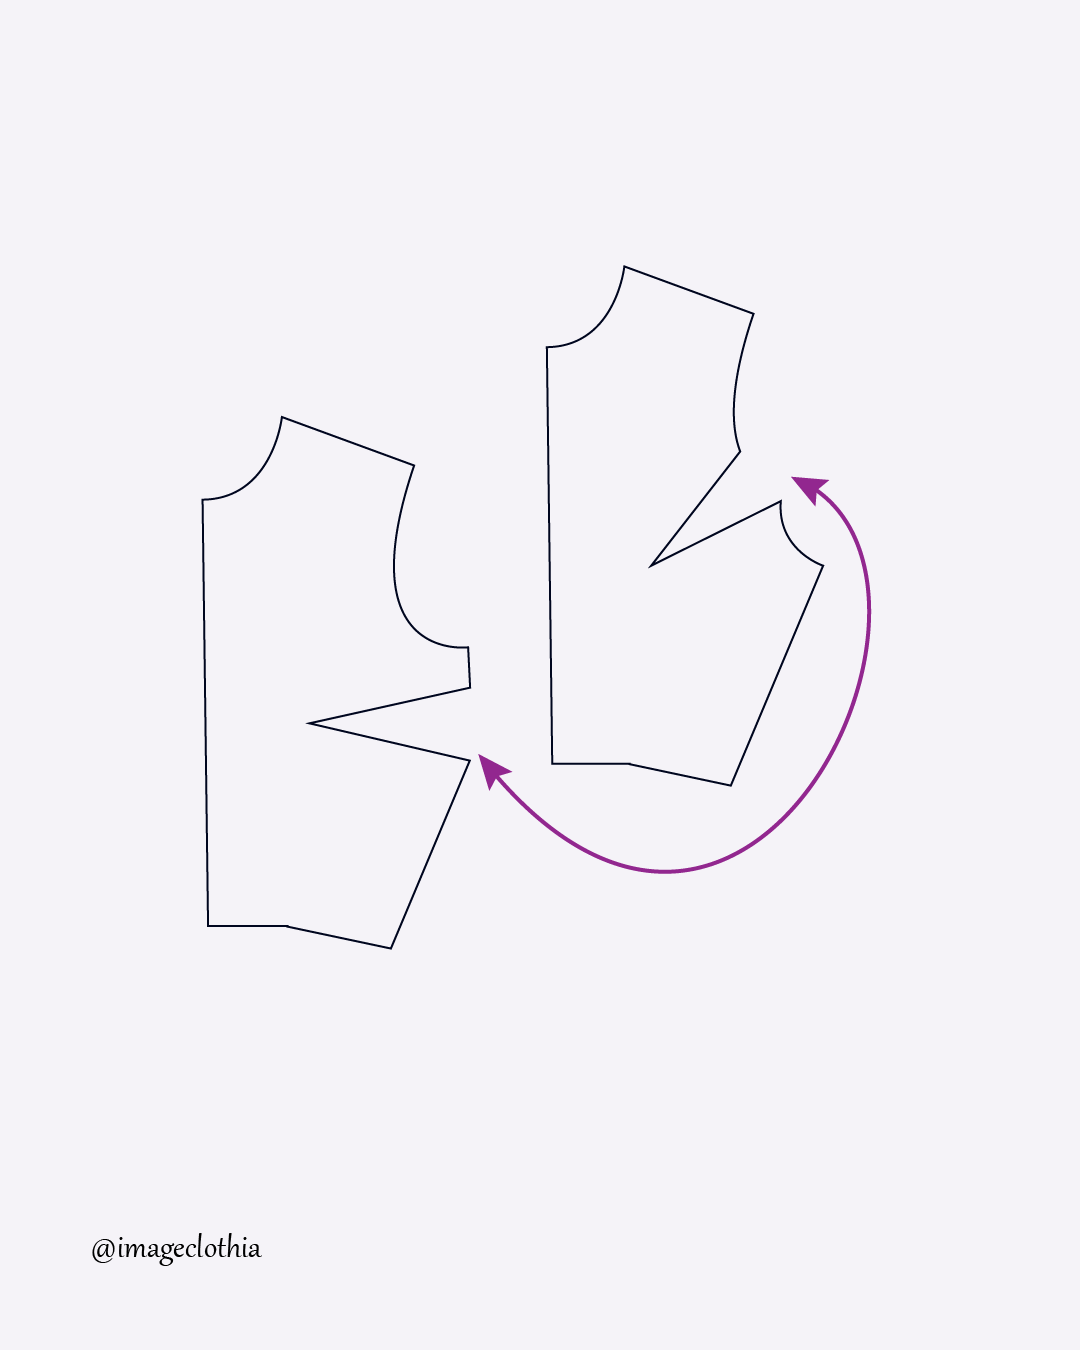
2. Princess Seams: Create flattering vertical seams from armhole or shoulder (for structure and style)
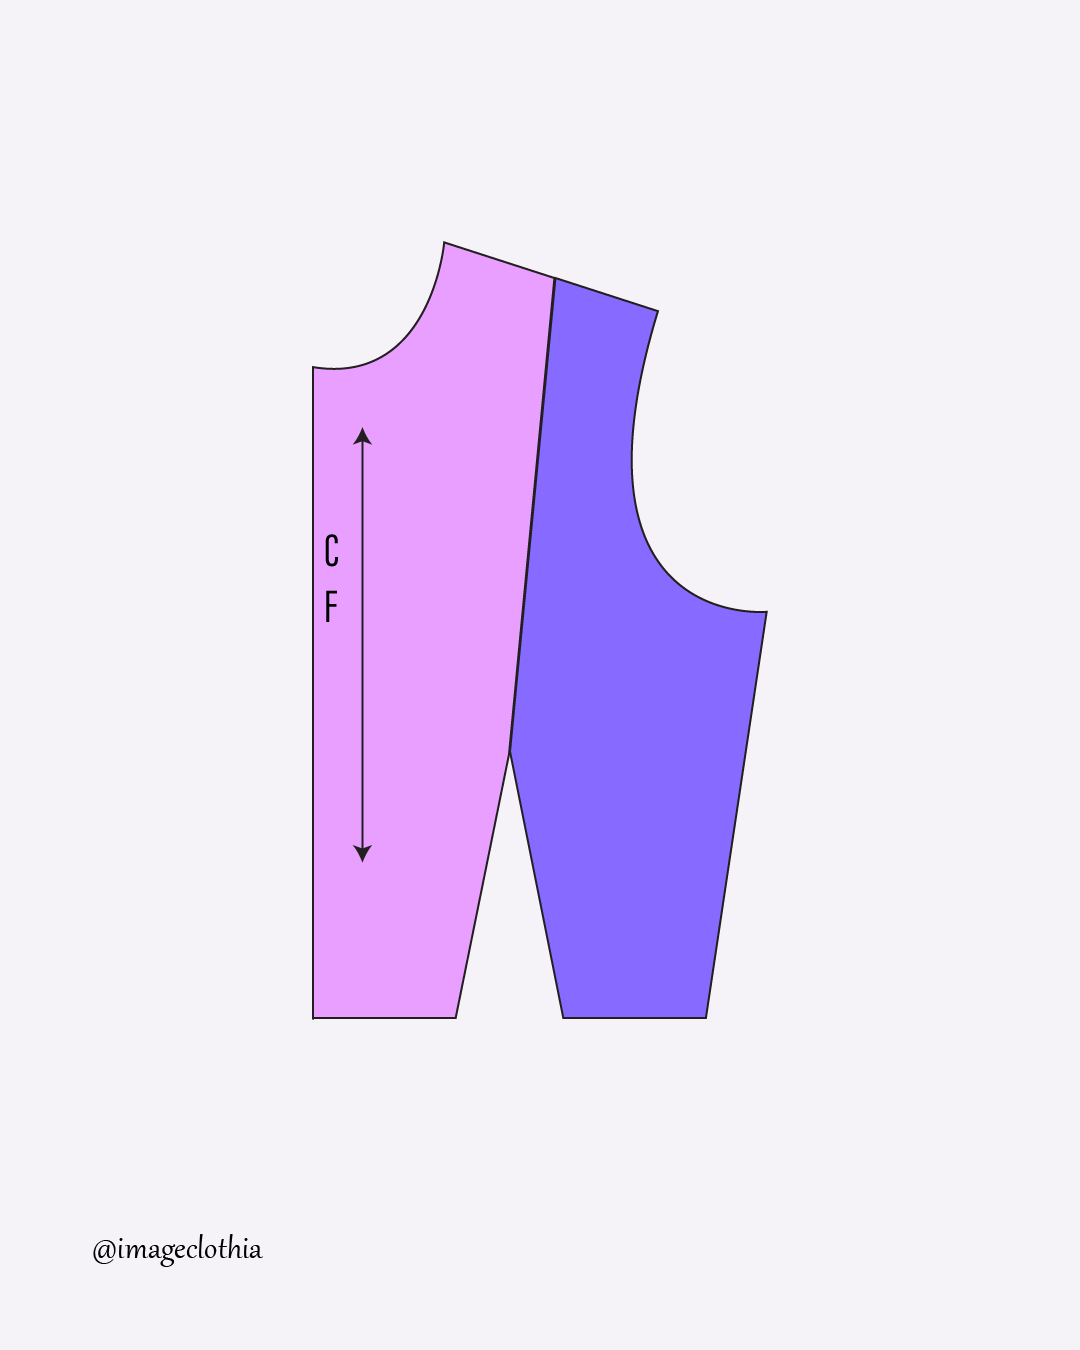
Princess seams are vertical seam lines that run from either the armhole or shoulder down through the bust, creating a flattering fitted shape without visible darts.
You have two options: armhole princess seams or shoulder princess seams.
For armhole princess seams:
Start with your basic bodice block, the one drafted to your measurements without ease. (If you learned to draft blocks from The Basic Pattern Set, this is your starting point.) Mark a point on the armhole where you want the princess line to start, usually about mid-armhole.
Draw a curve from that armhole point to touch your dart point (don’t go past it—just touch it).
Cut along this curve. You now have two pieces: your center front piece and your side front piece.
Blend the pattern pieces where you cut to ensure smooth curves.
For the back, follow the same process: mark a point on the armhole, draw a curve to the dart point, cut, and blend.
Add seam allowances to all pieces.
For shoulder princess seams:
The process is nearly identical, except you start from a point on the shoulder line instead of the armhole. Draw a line (not a curve this time) from the shoulder point to the dart point, cut, blend, and add seam allowances.
Common mistakes beginners make:
Missing the bust point entirely. Drawing the curve too far from the bust point means the seam loses its shaping function and creates a flat, awkwardly positioned line.
Not truing the seam lines. Your center and side panels must have matching lengths and smooth curves. If they don’t match, you’ll get puckers or stretching when sewing.
Ignoring body asymmetry. Most bodies are slightly asymmetrical—the princess seam on one side might need a tiny adjustment to sit smoothly.
Starting too close to the armhole or shoulder edge. This makes the seam curve too sharply over the bust, causing pointy or distorted shapes.
Skipping the test garment. Princess seams often need small corrections at the bust or waist. Skip the muslin, and you risk irreversible errors in your final fabric.
One basic block. Two seam placement options. A fitted, flattering silhouette without visible darts.
3. Dart Rotation: Move your dart to different locations for design variety (while maintaining the same fit)
Dart rotation is how you move a dart from one location to another without changing the fit of your garment.
The dart’s function is to shape a flat, 2D pattern into a 3D form that fits the curves of your body (like your bust). But its location is part of the design.
There are two methods for rotating darts: slash and spread, and pivoting. Let me show you both.
Method 1: Slash and Spread (Best for complex manipulations)
First, decide where you want your new dart to be. Draw a line from your bust point to that new location (for example, from bust point to shoulder line if you want a shoulder dart).
(Your bust point is marked on your basic bodice block—if you drafted it using The Basic Pattern Set, you already know exactly where this is.)
Draw another line from your bust point to the center of your existing dart.
Now cut along both lines (one to your new dart location, and one to your existing dart). Stop just before you reach the bust point. Leave a tiny hinge of paper.
Close your existing dart completely by bringing the two cut edges together.
As you close the old dart, the new dart automatically opens at your desired location. The pattern spreads at the new location, creating the new dart opening.
Tape or pin the closed dart in place, then trace your new pattern with the repositioned dart.
Method 2: Pivoting (Best when working directly from your block)
This method is cleaner and faster when you’re not cutting your original block.
Draw a line from your bust point to where you want your new dart location.
Your pivot point is the bust point itself.
Start tracing around your block clockwise from the new dart location (around the neckline, down center front, around the waist, up the side seam) until you reach the first leg of your original dart.
Stop. Hold the block down firmly at the bust point.
Rotate the block (usually counterclockwise) until the original dart closes completely.
Continue tracing from that point to where you started at your new dart location.
Remove the block and finish drawing in your new dart legs.
What makes both methods powerful: The wedge amount (the fabric being taken out for shaping) stays exactly the same. You’re just changing where that shaping happens. The fit doesn’t change. Only the appearance does.
You can move darts to the shoulder, neckline, side seam, armhole, or waistline. You can even turn them into design lines, gathers, tucks, or pleats (called dart equivalents).
(Want to master all the dart manipulation techniques, including fixing gaping necklines, converting ease into darts, and practicing essential darts like French darts, shoulder darts, and cut-away darts? Dart Manipulation in Practice is a self-paced video course that walks you through every technique step-by-step, with no previous experience required.)
What can go wrong:
With slash and spread: Cutting all the way through the bust point breaks the pattern into separate pieces and loses the hinge that allows the rotation to work properly. Always stop just before the bust point. Also, not securing the closed dart before tracing means the pattern can shift, resulting in inaccurate dart placement.
With pivoting: Not holding the pattern securely at the bust point during rotation results in inaccurate dart placement and size. The pivot point must stay fixed.
With both methods: Changing the wedge amount alters the fit. The amount of fabric being shaped must stay exactly the same when you move the dart.
One basic block. Two methods. Same perfect fit, completely different dart placement.
4. Peplum Blouse: Add a flared ruffle at the waist using circle drafting (and avoid the “stick out” problem)
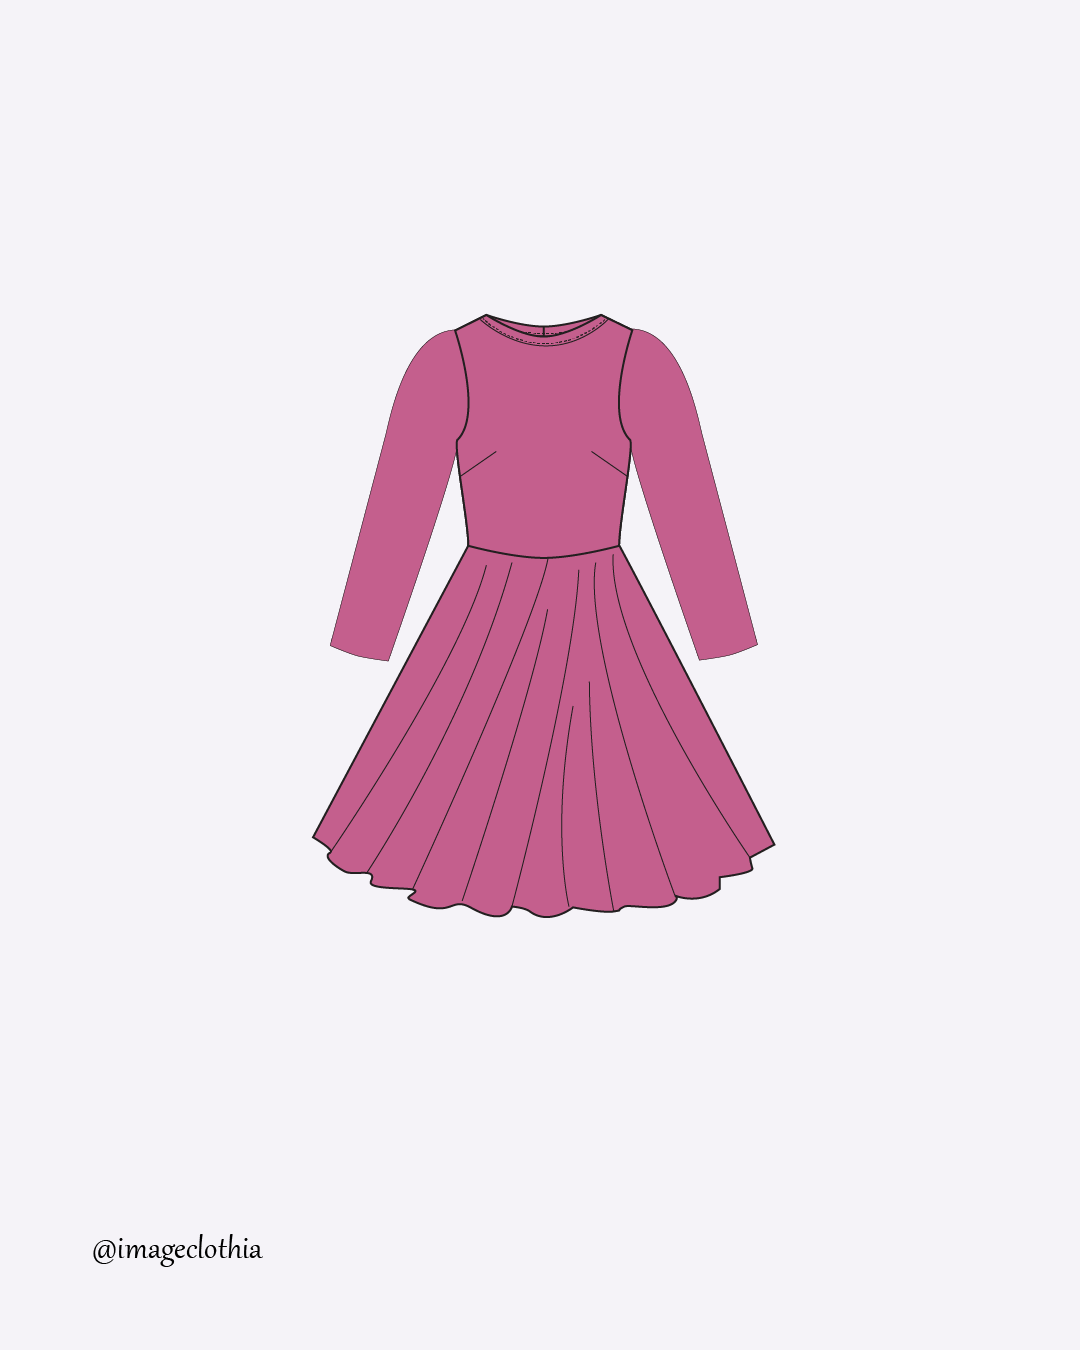
A peplum blouse adds a flared ruffle at the waist. It’s elegant, feminine, and surprisingly easy to draft using circle geometry.
Start with your fitted bodice block (waist length), the one drafted to your exact measurements without ease. (If you’re working from The Basic Pattern Set, this is the basic bodice block you learned to draft.) You need accurate waist shaping for the peplum to hang correctly, which is why blocks without ease are essential.
Decide your peplum style and length:
Gentle peplum: ½ or ¾ circle (subtle flare, good for blouses)
Full peplum: Full circle (dramatic flare, best for statement tops)
Length: Usually 4 to 8 inches below the waistline for tops
Draw a smooth, natural waistline along your block (follow your dart tips if they create a slight curve). Cut along this line. You now have your bodice top and your peplum attachment line.
Now draft the peplum using circle math.
The formula for the inner circle (your waist radius) is: r = Waist Circumference ÷ 2π
Adjust for desired fullness:
Full circle: use waist measurement directly
Half circle: double the waist measurement in the formula
¾ circle: divide waist measurement by 1.5
Mark this inner curve on pattern paper. Then measure your desired peplum length outward from that curve and draw the outer circle. That’s your peplum hem.
(Want to master circle drafting beyond basic peplums? Mastering Circle Skirts teaches you how to draft 360°, 720°, 1080°, and 1440° circles, plus circle skirts with trains, added fullness, and handkerchief flares. All using the same circle geometry principles.)
Match the peplum waist edge to the bodice waist seam, true your side seams so they align perfectly, and add seam allowances (1 to 1.5 cm at waist, 2 to 3 cm at hem).
Common mistakes beginners make:
Using the wrong block. Starting from a block with built-in ease means when you add flare, it exaggerates the looseness at the waist and makes the peplum stick out awkwardly. Always start from your fitted block.
Forgetting dart control. If darts aren’t closed before separating the waist, your waistline circumference will be inaccurate, causing gaping or puckering.
Miscalculating the circle. If your radius doesn’t match the waist seam length, the peplum won’t attach smoothly. Always measure the actual waist seam after darts are closed, then calculate.
Ignoring fabric behavior. Crisp cotton needs less flare. Drapey rayon needs more flare for visible movement. Knit peplums need less radius because stretch adds built-in ease.
Forgetting grainline placement. Circle pieces distort easily. Place your grainline through center front or center back, whichever has the straight edge or fold.
No trueing between front and back. Your side seams must match perfectly in both waist length and curve. Lay them together to check alignment before cutting fabric.
One basic block. Circle geometry. A peplum that flows beautifully instead of sticking out.
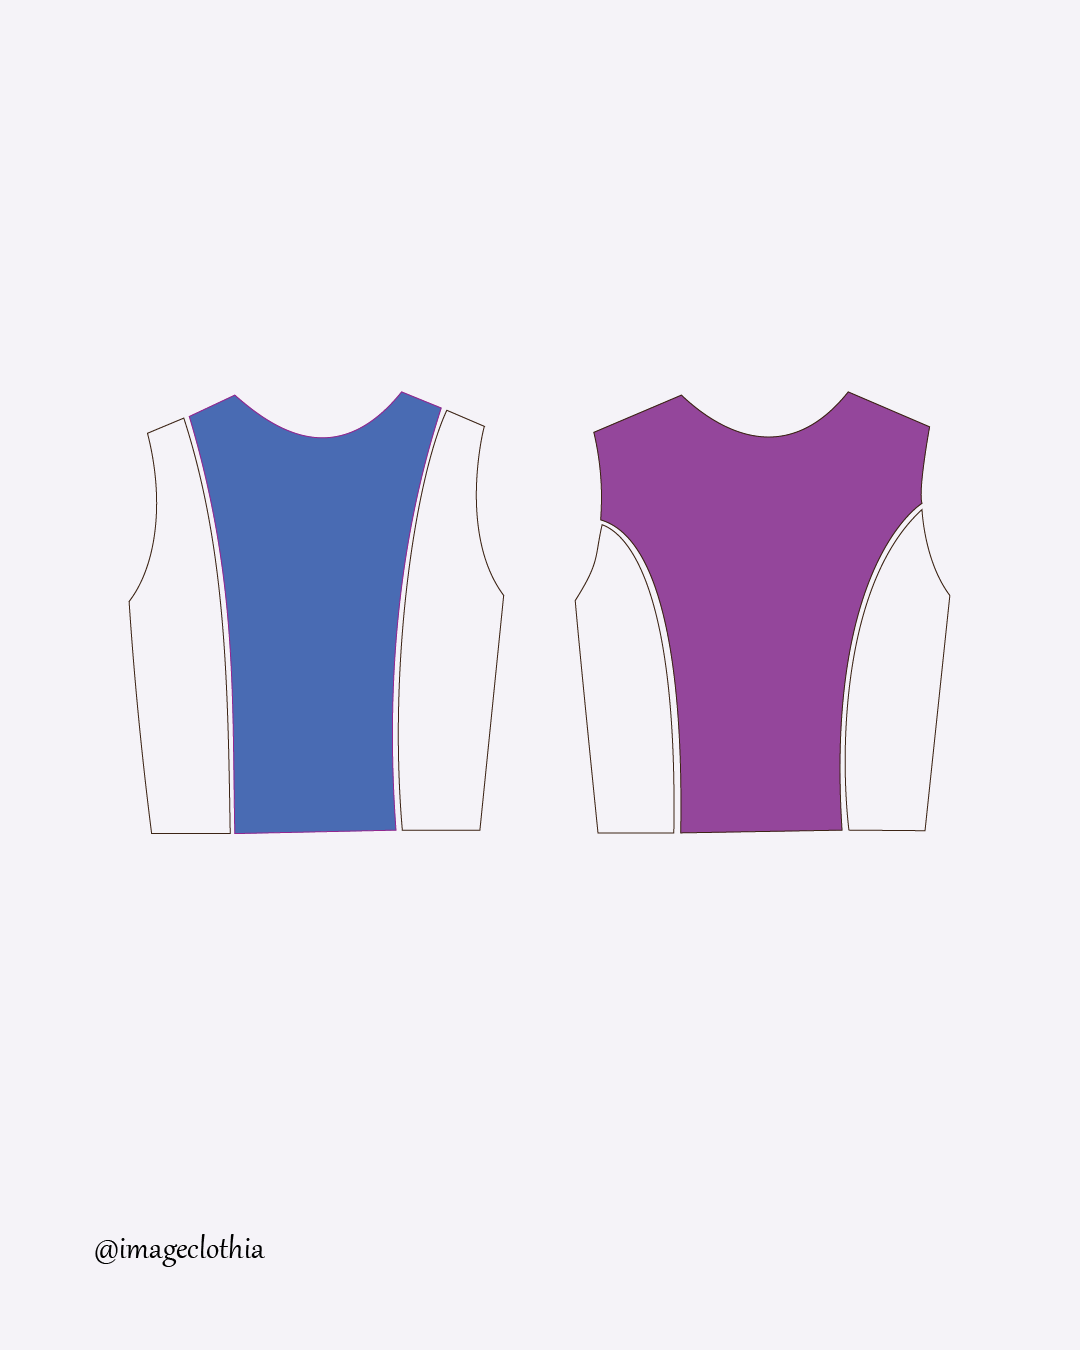
5. Sleeveless Top: Remove the sleeve and contour the armhole to eliminate gaping
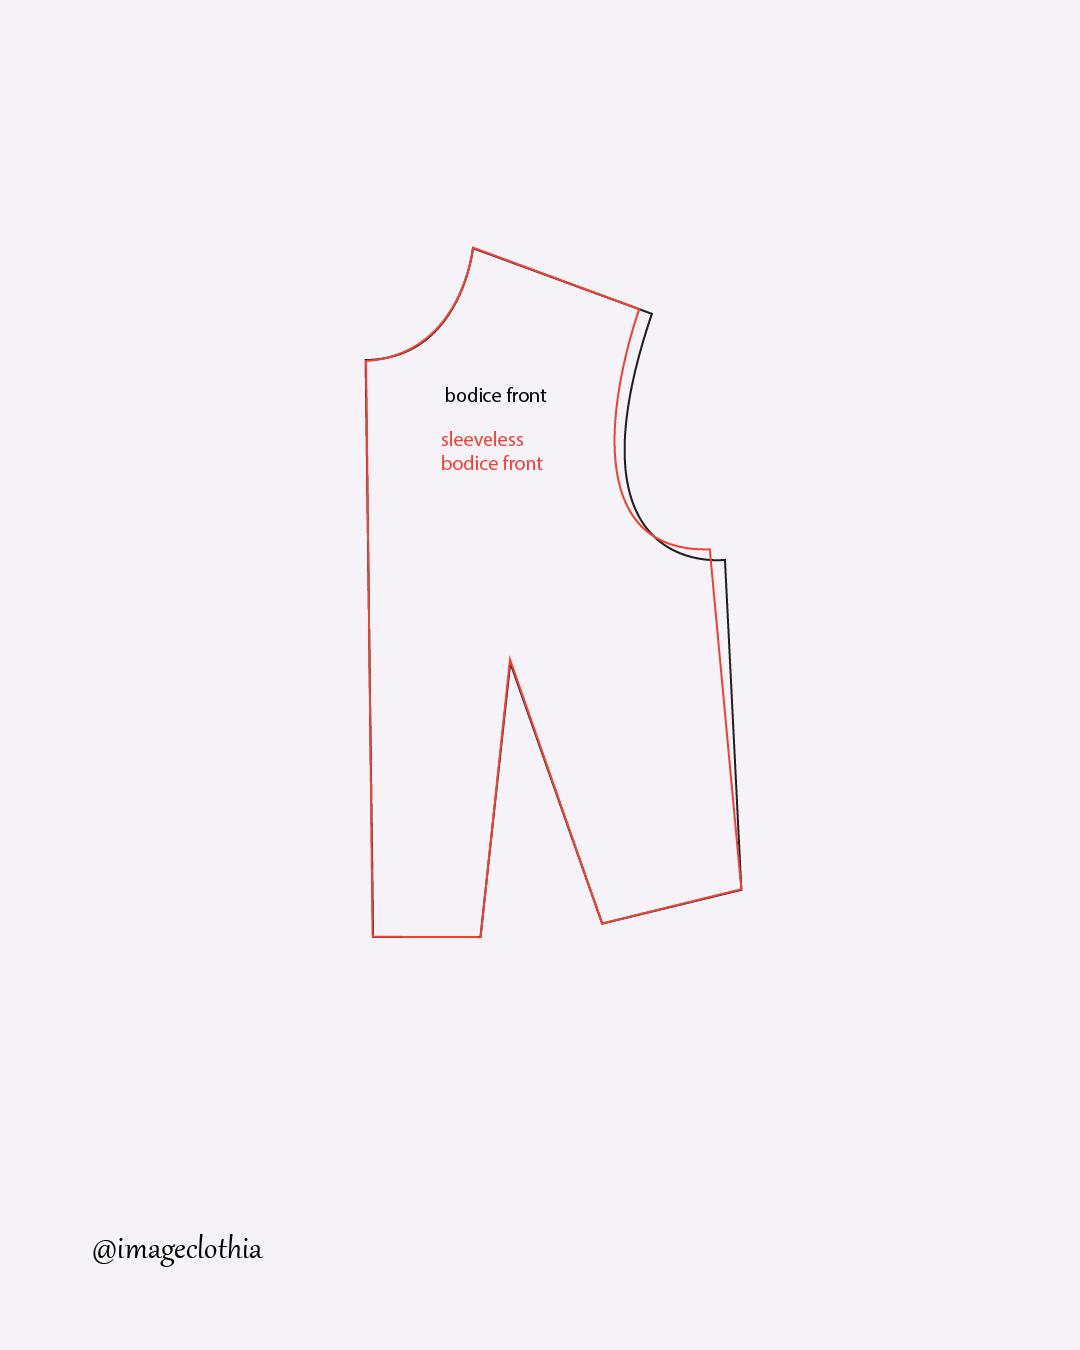
A sleeveless top seems simple. Just remove the sleeve, right?
Not quite. Remove the sleeve from a standard bodice block without adjustments, and you’ll get gaping around the armhole. The fit will feel loose and look unflattering.
Here’s why: The armhole in a sleeved block is wider and higher to accommodate the sleeve cap. When you remove the sleeve, that extra space becomes visible gaping because your body curves inward above the bust while the pattern stays flat.
The fix is called contouring. It means removing a small wedge of fabric to make the armhole sit snugly against your body.
Here’s how to do it:
Start with your fitted bodice block, drafted to your measurements with no ease. (This is exactly what you learn in The Basic Pattern Set, how to create blocks that truly fit your body without the looseness commercial patterns add.) Trace the front and back separately, then remove the sleeve and lower the armhole by about 1-1.5 cm for comfort and mobility. Don’t go deeper, you’re creating a sleeveless top, not a tank top.
Now identify and fix the gaping with contour shaping:
Draw a guideline from your bust point to mid-armhole (between shoulder and side seam).
Mark a dart intake of 1 to 2 cm along this line. This is the wedge you’re removing.
Close this contour dart by rotating it into your existing bust dart or waist dart. If your block already has a bust dart, rotate part of it upward into this contour dart. If it doesn’t, create a mini dart that vanishes into the armhole curve.
After closing or rotating the contour dart, redraw your armhole curve smoothly. It should now sit snugly against your body and flow naturally from shoulder to side seam. It should be slightly tighter than the original sleeved armhole.
Add seam allowances (usually 1 cm around the armhole) and finishing allowances for neckline and hem.
Common mistakes beginners make:
Forgetting that the sleeveless armhole is different. Using the sleeved bodice as-is means automatic gaping. The armhole needs to be adjusted—not just the sleeve removed.
Ignoring contour darts. Some try to fix gaping by pulling the shoulder seam forward or tightening the side seam. That only shifts the problem. The real fix is removing volume above the bust through contouring.
Over-contouring. Removing too much (more than 2 cm) can make the armhole dig into the front of your body or restrict movement. Stay between 1 to 2 cm.
Forgetting to true the armhole curve. After contouring, the curve often becomes jagged or uneven. Always blend the line smoothly and ensure front and back armhole seams match in length and balance.
Not testing with a muslin. Armhole fit is one of the most personal, shape-dependent areas. What looks right on paper might feel tight in motion. Always test before cutting final fabric.
Pro tips: If gaping happens only at the front, contour the front armhole only. If it happens both front and back, contour both, but less at the back (usually 0.5 to 1 cm). And remember: bust point location is key. If it’s too low or too high, your contour correction will be misplaced.
One basic block. Strategic contouring. A sleeveless top that actually fits.
Which of these transformations are you most excited to try? Drop a comment and let me know, I’d love to hear what you’re planning to make first!
One Block, Endless Possibilities
Five completely different tops. All from one basic bodice block.
This is what most pattern-making resources don’t teach you: the bridge between drafting a block and creating actual wearable garments. They show you how to draft the foundation, but they don’t show you what to do with it next.
But here’s the thing: you can’t get to the transformation stage without first learning the foundational basic blocks.
The current version of The Basic Pattern Set teaches you exactly that: how to draft the foundational blocks (the basic bodice, skirt, sleeve, off-shoulder blouse, and princess blouse). These are the templates you need before you can create any garment variation you want.
Without these foundations, those five bodice variations I just showed you? Impossible.
And here’s what’s coming: I’m updating The Basic Pattern Set right now, and the new version will show you exactly how to transform those foundations into wearable garments. It’s currently in the typesetting stage.
The updated version will bridge that gap completely, showing you not just how to draft the blocks, but how to manipulate them into the specific styles you want to make. Like the five bodice variations you just learned about.
If you’ve been thinking about learning pattern making, or if you’re tired of adjusting commercial patterns that never fit your body, grab the current version now at the current price. When the update launches, you’ll get access to the new version automatically.
You need the foundation first. Then the transformation becomes possible. And soon, you’ll have both.