
The Complete Guide to Adding Ease: Where, How Much, and In What Order

“Where do I add it? Do I add it all along the side seams? Or only at the hips?”
I get this question constantly. And I understand the confusion because my previous post on ease explained the why and how much, but not the precise where and how.
You can read my previous post about ease here –>

So let’s fix that. This is the step-by-step guide to adding ease that actually answers: Where exactly does the ease go? How do you distribute it? And what order do you do it in?
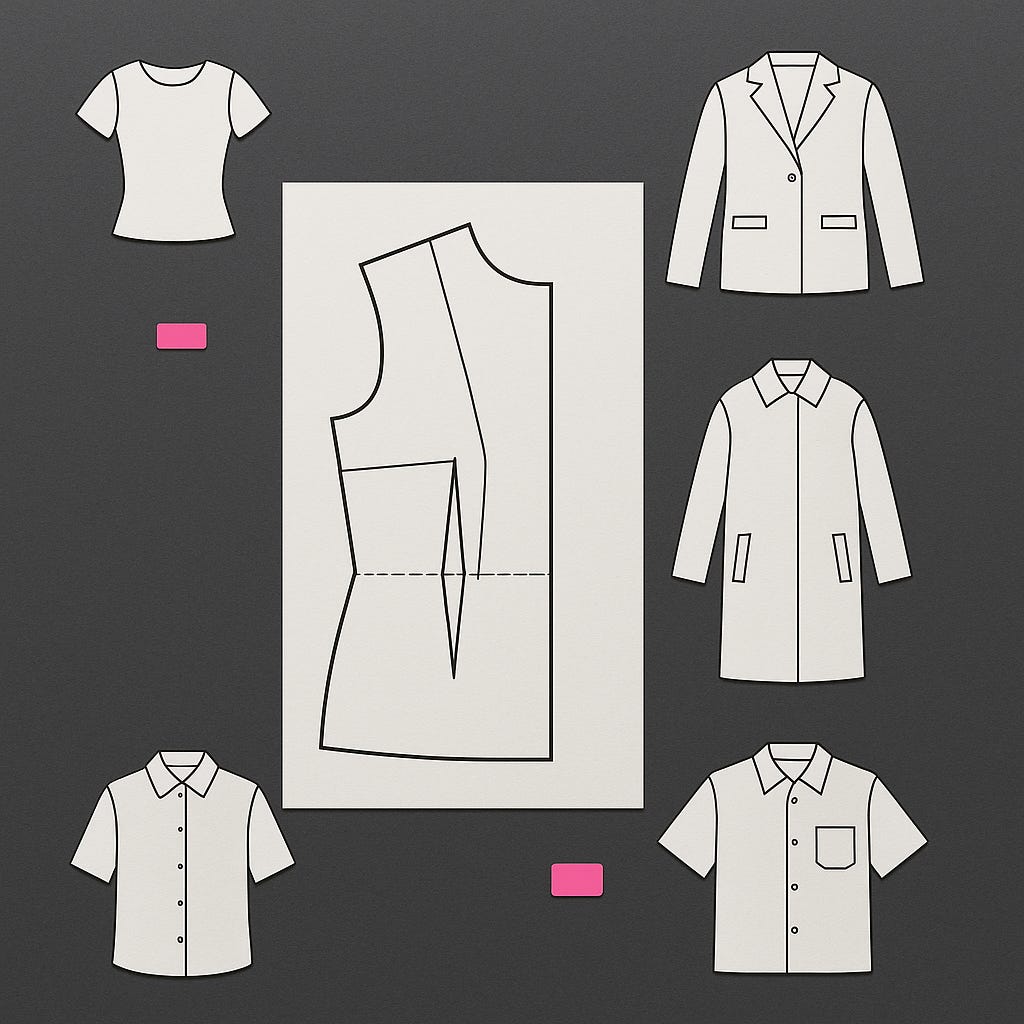
First: Understand What You’re Working With
Before you add any ease, you need to know what’s already in your pattern.
If you’re working from a basic bodice block (for woven fabrics):
Upper bust area (armhole level): approximately 6 inches of ease already built in
Bust area: approximately 4 inches of ease already built in
If you’re working from a sleeveless block:
Upper bust: approximately 3.5 to 4 inches of ease
Bust: approximately 1.5 to 2 inches of ease
If you’re working from a zero-ease block (moulage):
You’re starting from scratch, every bit of ease needs to be added
This matters because you need to know your starting point before you decide how much MORE to add.
The Rule You Need to Remember
Ease is added at the SIDE SEAMS (primarily), not at center front or center back.
Why? Because the human body is wider side-to-side than it is front-to-back. When you need more room, you create it by widening the pattern at the sides where your body naturally expands.
There are exceptions (we’ll get to those), but 90% of the time: side seams are where ease lives.
How to Distribute Ease: The Math
Here’s the formula that makes this work:
Total ease needed ÷ 4 = amount added to each side seam
Why divide by 4? Because you have:
Front pattern (2 side seams: left and right)
Back pattern (2 side seams: left and right)
Example: You want to add 2 inches of bust ease to your bodice.
2 inches ÷ 4 = 0.5 inch (or 1.25 cm)
You add:
0.5 inch to the right side seam of the front pattern
0.5 inch to the left side seam of the front pattern
0.5 inch to the right side seam of the back pattern
0.5 inch to the left side seam of the back pattern
When you sew the garment together, those four additions create 2 inches of total ease around the body.
Where Along the Side Seam? It Depends on the Garment
This is where it gets specific.
For a Fitted Bodice or Blouse
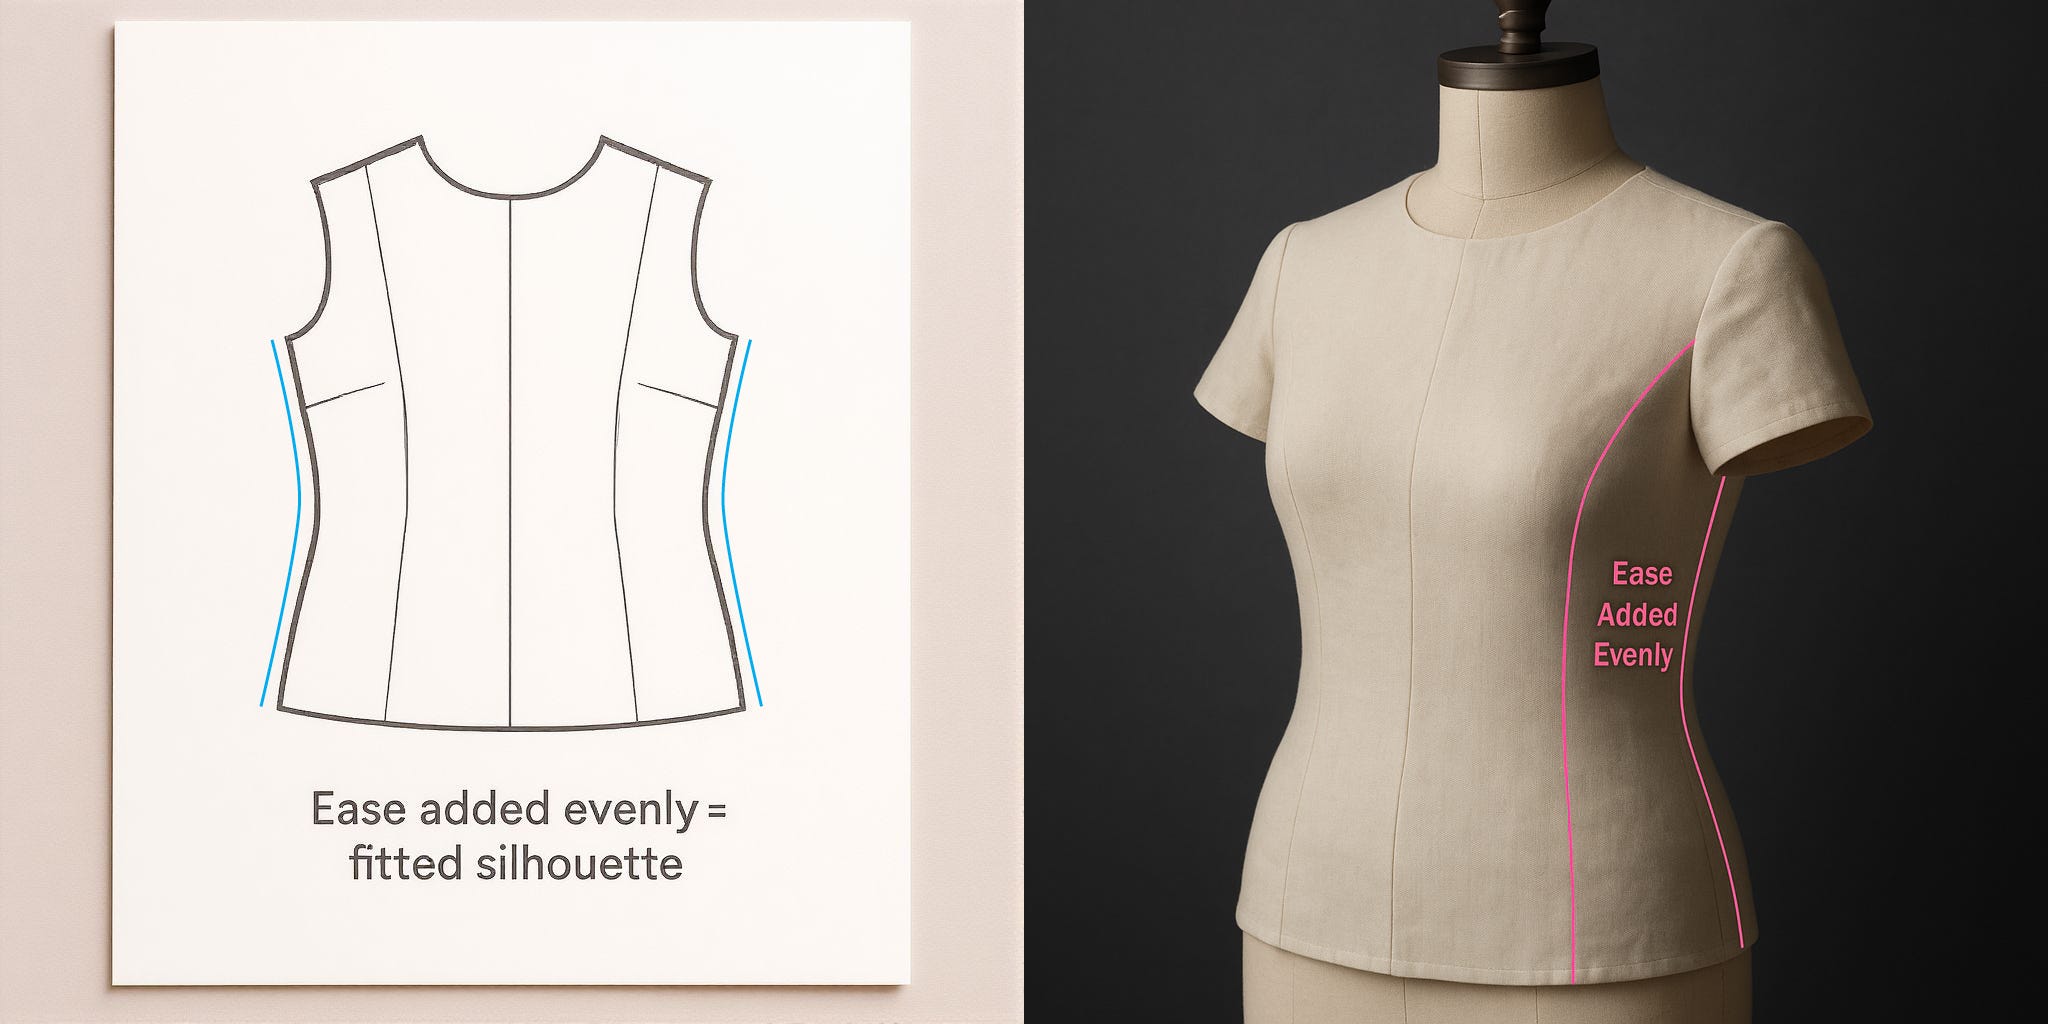
Add ease evenly down the entire side seam.
If you’re adding 0.5 inch at the side seam:
Add 0.5 inch at armhole level
Add 0.5 inch at bust level
Add 0.5 inch at waist level
Draw a smooth line connecting all those points
This maintains the fitted silhouette while giving you breathing room throughout.
For a Fitted Jacket
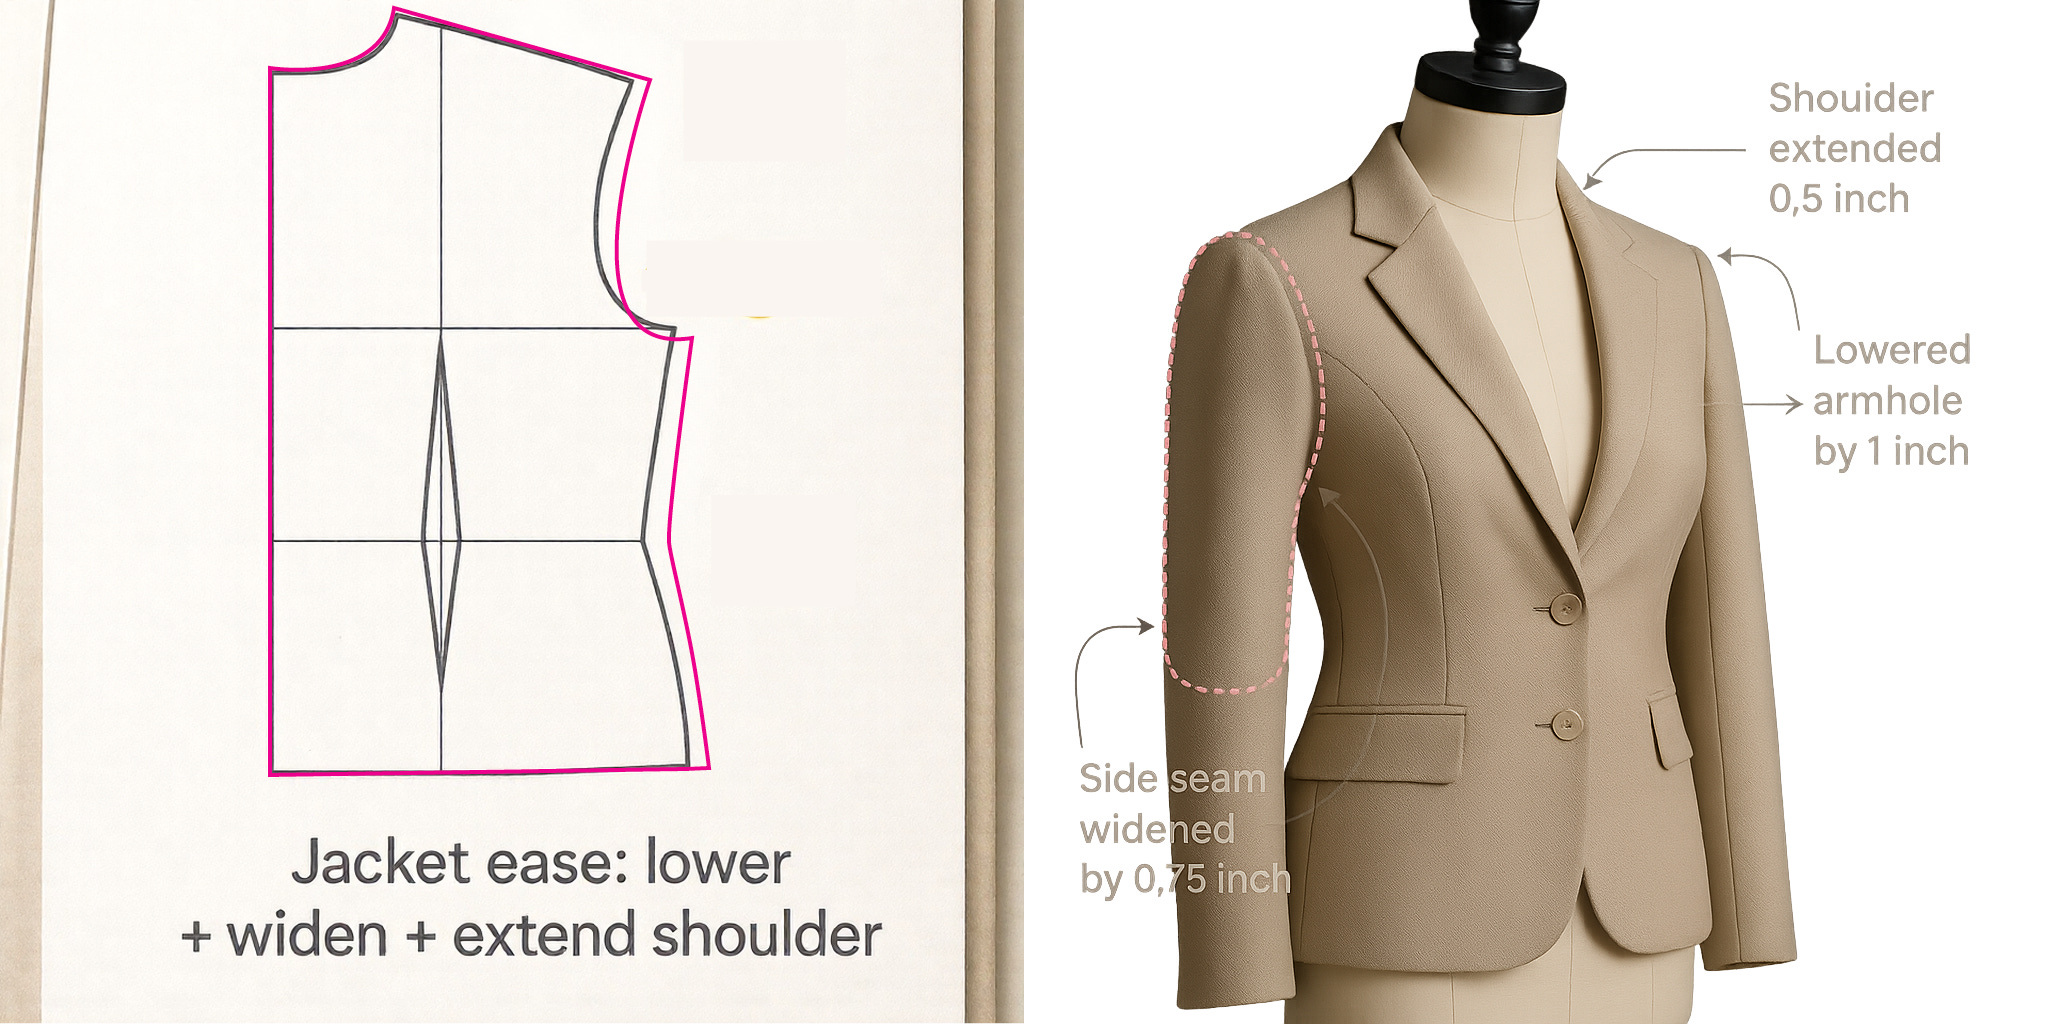
Step 1: Relax the armhole first (before adding width)
Transfer about 0.5 inch (1.25 cm) from your side seam dart into the armhole using dart manipulation. This opens up the armhole slightly so you can wear layers underneath.
(Your side seam dart gets smaller, your armhole gets bigger, but your side seam length stays the same.)
Step 2: Lower the armhole
Lower the armhole by 1 inch (2.5 cm) on both front and back.
Step 3: Add width at the side seams
Add 0.75 inch (2 cm) at the armhole level on both front and back side seams.
Continue that 0.75 inch addition all the way down the side seam to the hem.
This gives you 3 inches of total additional ease (0.75 × 4 = 3 inches) on top of what’s already in your block.
Step 4: Extend the front shoulder
Extend the front shoulder line out by 0.5 inch (1.25 cm) before redrawing the armhole curve.
(If you’re not using the back shoulder dart, this makes the front and back shoulder lengths equal.)
For Coats and Oversized Garments (More Than 4 Inches Total Ease)
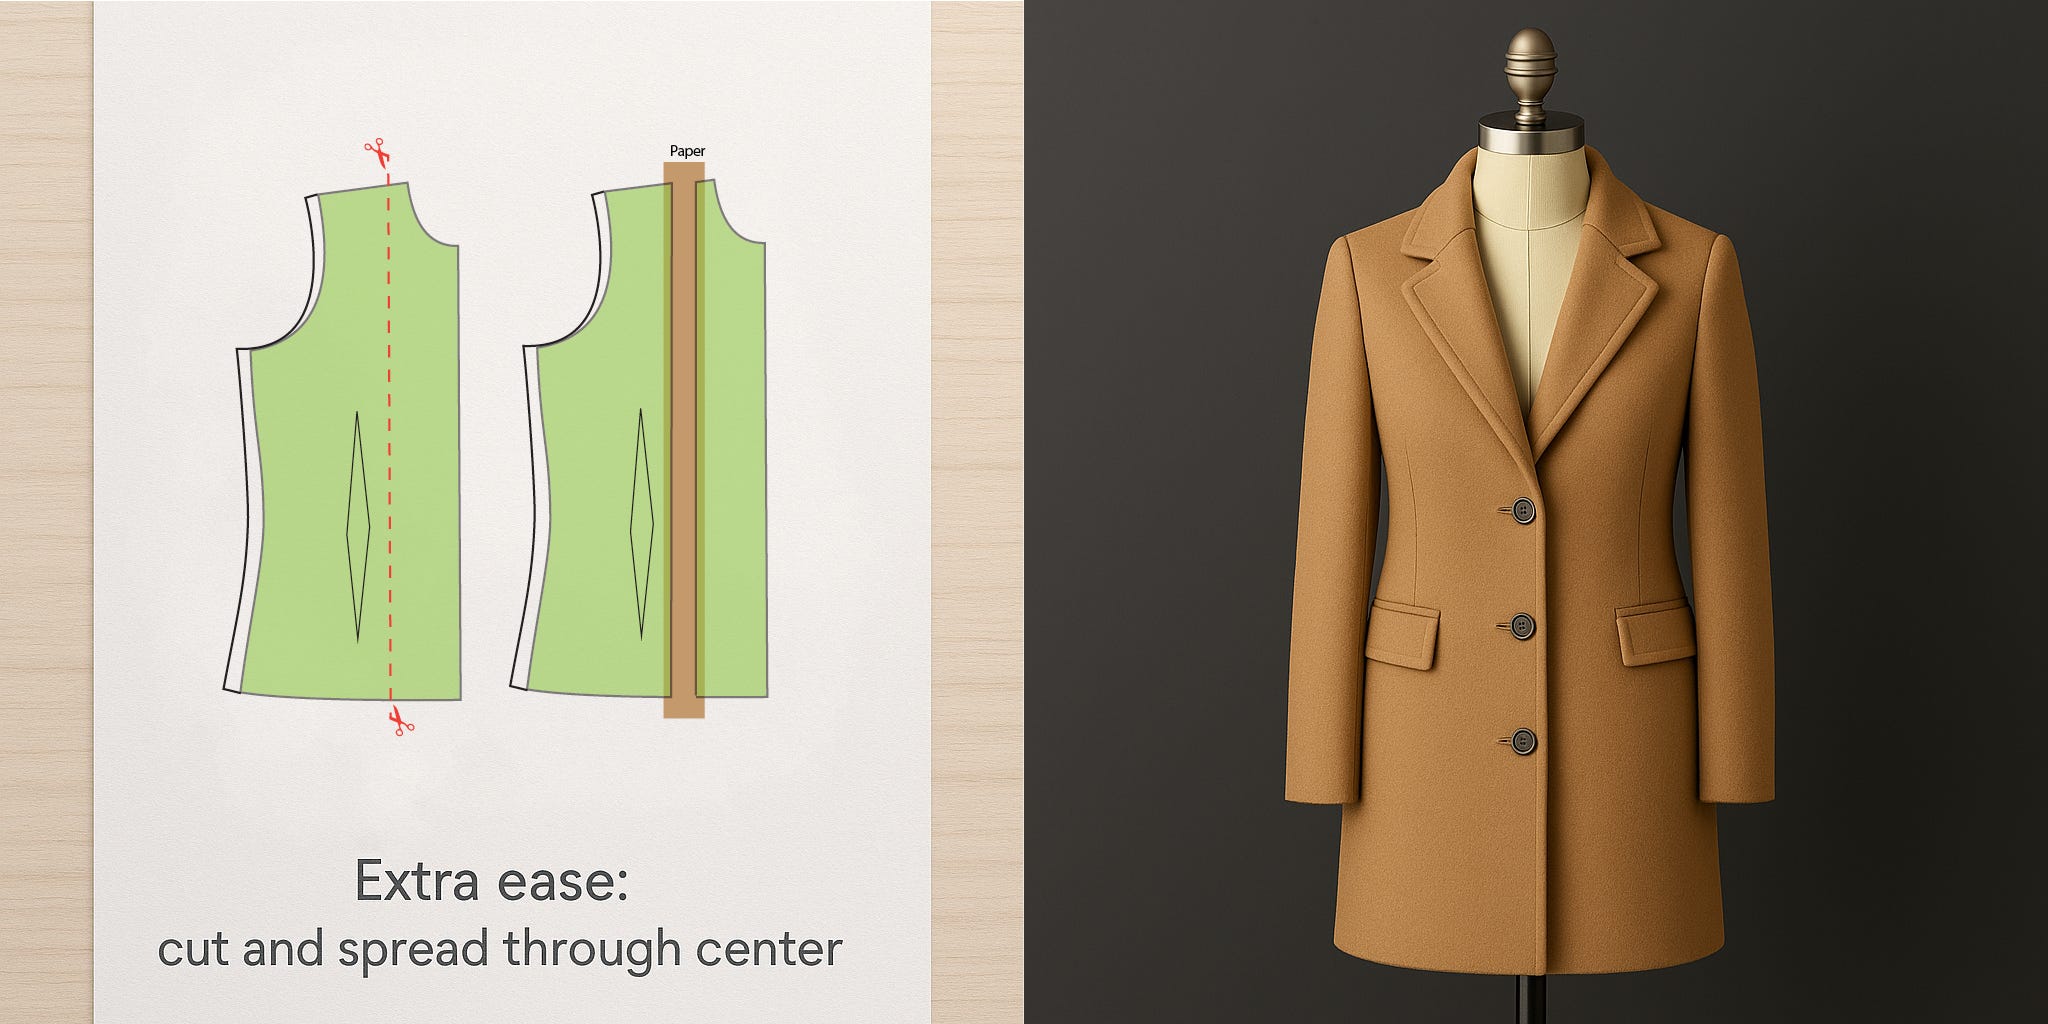
Step 1: Do everything for the fitted jacket above
Relax armhole, lower it, add 1 inch at side seams (giving you 4 inches total ease).
Step 2: Add MORE ease by cutting and spreading
Draw a vertical line down the center of your front pattern, between the high neck point and the first dart. (Stay away from the neckline.)
Cut along that line and spread the pattern apart by 0.25 to 1 inch (depending on how much extra ease you want).
Place paper underneath and tape it down.
Do the same to the back pattern, cutting and spreading so the shoulder lines match up.
This adds 1 to 4 inches of additional ease across the whole garment (depending on how much you spread).
The garment can still look fitted (if you maintain waist shaping) or boxy (if you keep the ease straight down).
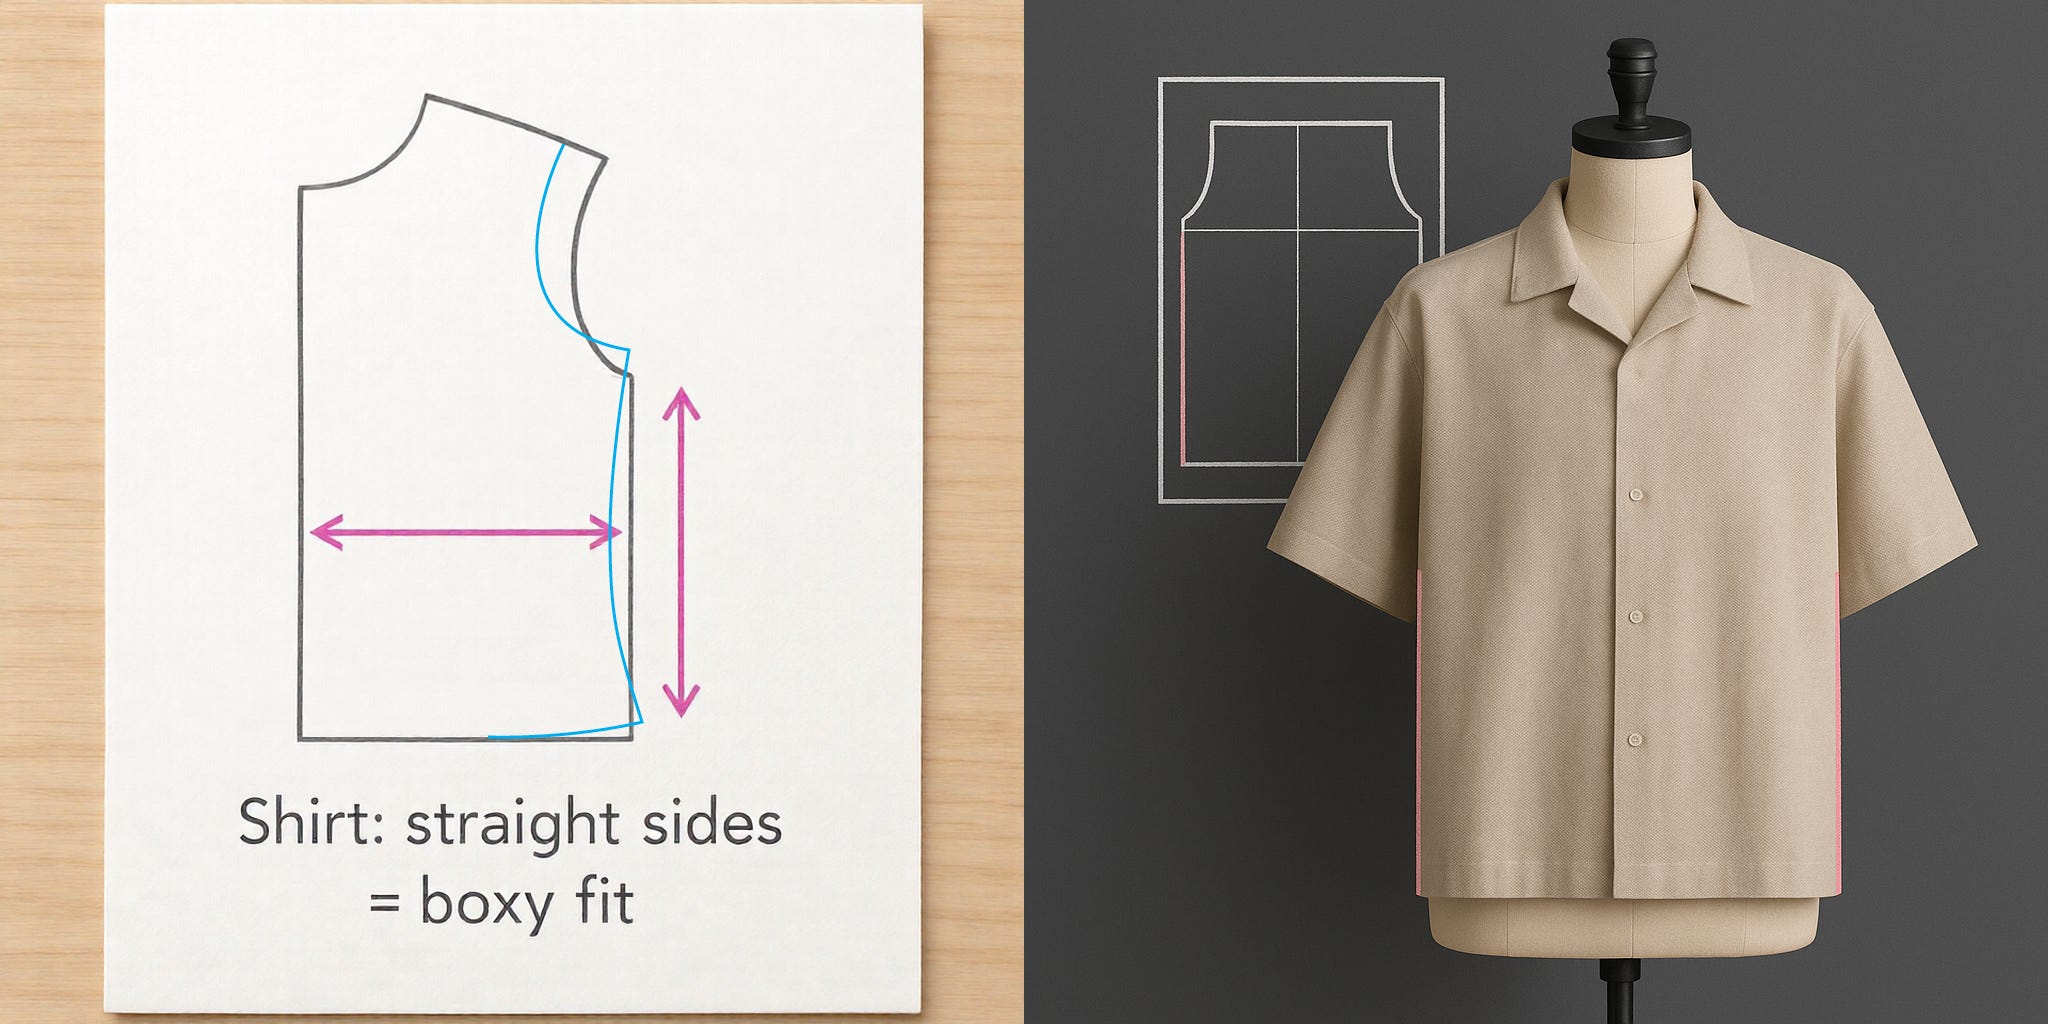
For Shirts (Boxy, Relaxed Fit)
Step 1: Relax the armhole
Transfer 0.5 inch from side seam dart into armhole (same as jacket).
Step 2: Lower and widen
Lower armhole by 0.75 inch.
Widen at the underarm point by 0.75 inch on both front and back.
Extend the shoulder line.
Step 3: Draw straight down from the new underarm point
Here’s what makes a shirt different: instead of tapering the ease proportionally, you draw a STRAIGHT LINE down from the new underarm/width point all the way to the hem.
This creates way more ease at the waist than at the bust, giving you that boxy, square shirt silhouette.
(You can still include darts or not, depending on the design, but the overall shape is loose and rectangular.)
What About Ease at Different Body Points?
“Do I add ease at the bust, waist, AND hips? Or just one?”
It depends on the silhouette you want.
Fitted garments: Add ease evenly at bust, waist, and hips. Maintain the body’s proportions.
Straight/boxy garments: Add more ease at the waist than at the bust. Create a straight up-and-down look.
A-line garments: Add more ease at the hem than at the bust. Flare out from the body.
The ease doesn’t have to be the same at every point. You control the silhouette by deciding where the extra space goes.
What If Your Pattern Has Princess Seams or Other Vertical Seams?
Ease still goes at the OUTER edges (the side seams), not at the princess seam lines.
Princess seams are design lines that shape the garment. They don’t typically get widened for ease.
If you need ease, you add it at:
The side seam of the side front piece
The side seam of the side back piece
The center front and princess seam lines usually stay where they are.
Exception: If you’re creating an oversized garment and using the cut-and-spread method, you might cut through a princess seam line to add fullness, but that’s for design effect, not standard ease.
Do Armholes and Necklines Need Ease?
Necklines: Generally no. The neckline stays the same unless you’re specifically redesigning it.
Armholes: Yes, but indirectly.
When you add ease to the bodice width, the armhole automatically gets slightly larger because the side seam moves outward.
For jackets and coats, you also:
Relax the front armhole by transferring dart value into it (as described above)
Lower the armhole depth to accommodate layers
But you don’t typically add ease by making the armhole curve itself bigger, you add it by repositioning where the armhole sits.
Adding Ease to Skirts
For straight skirts:
Add ease evenly at the side seams. Same math: Total ease ÷ 4.
If you want 2 inches of hip ease:
Add 0.5 inch to each side seam (front right, front left, back right, back left)
For A-line or flared skirts:
You still add the ease at the side seams, but you add MORE at the hem than at the waist.
Example:
Add 0.5 inch at the waist (side seams)
Add 1 inch at the hem (side seams)
Draw a smooth line connecting them
This creates the flare while maintaining fit at the waist.
Reducing Ease (Making Patterns More Fitted)
Same principle in reverse.
If a pattern has too much ease and you want it more fitted:
Total ease to remove ÷ 4 = amount removed from each side seam
Example: Your pattern has 4 inches of ease at the bust, but you only want 2 inches.
4 - 2 = 2 inches to remove
2 ÷ 4 = 0.5 inch removed from each side seam
Important: You can reduce ease at the bust/upper bust, but don’t go too far or you won’t be able to move your arms (especially in garments with sleeves).
You can reduce ease more aggressively at the waist if you want a very fitted look—just make sure you can still breathe and sit down.
Common Mistakes
Mistake 1: Adding ease at center front or center back
Don’t do this unless you’re specifically creating design fullness (like pleats or gathers). Ease goes at the sides.
Mistake 2: Adding different amounts to front and back
Unless you have a specific design reason, add the same amount of ease to both front and back. Keep the garment balanced.
Mistake 3: Forgetting to lower the armhole when adding width
If you widen the bodice without lowering the armhole, the armhole becomes too tight and restricts movement. They work together.
Mistake 4: Adding ease only at one point (like just at the bust)
If you add ease at the bust but not at the waist, you create a weird bulge. Add it consistently down the side seam (unless you’re intentionally creating a specific silhouette).
Fabric Matters
Woven fabrics (cotton, linen, wool): Use the full ease amounts described above.
Knit fabrics (jersey, modal): Reduce ease by 25-50% depending on how stretchy the fabric is. Very stretchy knits need almost no ease.
Stiff fabrics (denim, canvas, leather): May need slightly MORE ease because they don’t give or drape.
Drapey fabrics (silk, rayon): Can sometimes use slightly less ease because they flow over the body naturally.
Testing Your Ease
Always make a muslin (test garment) when trying a new ease amount.
What looks right on paper might feel too tight or too loose on your body. Ease is 3D—it distributes front-to-back and side-to-side, and you won’t know if it’s right until you put it on.
Pay attention to:
Can you move comfortably?
Can you sit, bend, reach?
Does the silhouette look intentional or sloppy?
Are there any pulling or strain lines?
Adjust from there.
Takeaway
Ease goes at the side seams.
The math: Total ease needed ÷ 4 = amount added to each side seam.
The distribution depends on the silhouette you want:
Fitted: ease added evenly down the side seam
Boxy: more ease at the waist than the bust
A-line: more ease at the hem than the waist
For jackets and coats: relax the armhole first, then lower and widen.
For extreme ease (coats, oversized): cut and spread through the center of the pattern.
Master this, and you’ll stop guessing. You’ll know exactly where to add ease, how much, and why—so every garment fits the way you intended.
Get the Complete Toolkit (Free)
I’ve packaged everything you need into one downloadable PDF, and it’s completely free.
The Complete Ease Toolkit includes:
✅ Ease Cheat Sheet - Standard ease amounts for every garment type with the divide-by-4 formula
✅ Ease Worksheet - Fill-in guide to calculate ease for YOUR specific measurements
✅ Visual Diagrams - See exactly where ease goes on fitted bodices, jackets, coats, and shirts
✅ Common Mistakes Checklist - Avoid the 7 most common ease errors
Print it, reference it at your sewing table, and never guess about ease again.
Download The Complete Ease Toolkit (Free) →
📖 This is the foundation of what I teach in my pattern drafting guides. My book The Basic Pattern Set starts you with a zero-ease block (your moulage), and from there, you get to choose exactly how much wearing and design ease to add for every project.

And here’s what’s coming: I’m updating The Basic Pattern Set right now to include drafting blocks WITH ease already built in—so you’ll have both options: start from zero-ease and add your own, or start from blocks with standard ease already included.
The update is currently in the typesetting stage.
If you buy now:
✅ You get the current version immediately at the current price ($9.99 Amazon / $12 PDF)
✅ You get the updated version with ease blocks automatically when it launches
✅ No extra cost—same purchase, better book
If you wait:
❌ The price will approximately double when the update goes live (~$20 Amazon / ~$24 PDF)
❌ You’ll pay more for the same content
Grab it now before the price increase:
👉 Get The Basic Pattern Set on Amazon for $9.99
👉 Get the PDF for $12
It’s the difference between sewing “close enough” and sewing garments that feel like they were made for you, because they were.
This is really helpful. I want to adapt my basic block to a waisted pinafore that I can wear something underneath. In that case do you need to add to the centre as well?